MATHCHA EDITOR
A WYSIWYG Math Editor
Introduction
- Name : Mathcha Editor
- Version : v 0.1 (Alpha)
- Support Email : team@mathcha.io
1. Text Mode
Default text input is in Text Mode, which only allows to input normal text, (Unicode is supported).
Options available in text mode:
1.1. Page Options

- Click (1) to set text align for selected line with Left, Center, Right
- Icon (2) to add section title for selected line maximum with 3 levels, click on to increase/decrease one level
- Icon (3) for list items with number, and (4) for list item with bullets, both have maximum of 3 levels.
- Use (5) to indent or outdent current lines
1.2. Font Options

- Respectively is for font name, font size, bold, italic, underline and strike through
- If you change font size of selected text, and there are Math formulas iniside your selection, those formulas font size will also be changed.
1.3. Suggestion box
Suggestion box is the core of editor (trigger by "\" on keyboard, ⌘ + Enter or Alt + Enter(Windows)), the main purpose is to input text and mathematic symbols as quick as possible and not losing the flow of input. (by not moving mouse). Suggestion box will be different from Text Mode and Math Mode

2. Text Mode Suggestion Box
2.1. Inline Math
Name: \inline-mathShortcut: $
Insert Math as the same line with normal text, For example:

Most of symbols are the same in \inline-math and \math-container, but there are one difference, these symbols below will be display in smaller fonts:
- \frac
- \binom
- \int, \sum, \prod, ... (symbols in the group of Integral and Summation), and default
position of limits on the right of Symbol instead of above/below (in \math-container).
For example
If you want to use normal font for those symbols, select those symbols and click on For example, now it becomes

With \binom, you also use \dbinom to force Binom in normal font
Note*: if you use Tab inside Math Mode, cursor will jump outside current region. For example I have this equation:
 . If you place your cursor inside that equation, and press Tab, your cursor
will be at the end of that equation and go outside Math Mode.
. If you place your cursor inside that equation, and press Tab, your cursor
will be at the end of that equation and go outside Math Mode.
2.2. Math Container
Name: \math-containerInsert Math as new line, and align center automatically. For example:

There some symbols which can be in smaller fonts by using
 , they are: • \frac,
\binom, \int, \sum, \prod, ... (symbols in the group of Integral and Summation). For example:
, they are: • \frac,
\binom, \int, \sum, \prod, ... (symbols in the group of Integral and Summation). For example:

In this mode, we also can make a tag on the right of \math-container, by hovering the mouse on each line, you will see (...), click on that, tag number will be shown (number will be automatically increasing in whole document). For example:

The tag can also be modified by clicking on the tag and select (A) icon, then input Text. For example:

Tag can be removed by unselect

There are various fonts supported in Math Mode, for example the most common symbols are R, N, should be displayed as:

This can be achieved by selecting \mathbb font:

Tip:
- Shortcut for Bold is Cmd+B for both Text Mode and Math Mode
- Shortcut for \mathbb is Cmd+Shift+B, and \mathcal is Cmd+Shift+C

2.3. From Latex
Name: \from-latexOpen Latex Import Dialog, please refer Import Latex Section for more information
2.4. Diagram
Name: \diagramInsert Drawing region, please refer Diagram Section for more information
2.5. Tag Reference
Name: \tag-ref With
any formula with the Tag, for example formula above have the tag (Tag 1), this feature allow
you to insert tag as a link to refer to that formula. The advantage of using this one instead
of typing (Tag 1) is it allows to click on the (Tag 1) to link to formular, as well as any
modifying from the Tag, the other link to that tag will be modify accordingly. As selecting
this featue, you will be asked to select formula as image below:
With
any formula with the Tag, for example formula above have the tag (Tag 1), this feature allow
you to insert tag as a link to refer to that formula. The advantage of using this one instead
of typing (Tag 1) is it allows to click on the (Tag 1) to link to formular, as well as any
modifying from the Tag, the other link to that tag will be modify accordingly. As selecting
this featue, you will be asked to select formula as image below:

2.6. Align Layout
Name: \alignInsert Align layout, please refer Align Section for more information
2.7. Gather Layout
Name: \gatherInsert Align layout, please refer Gather Section for more information
2.8. Multiline Layout
Name: \multlineThis layout is used when you have a long formula and you want to break it down to multiline. In this layout, text align is based on:
- First line is Left Align
- Last line is Right Align
- Any Line in middle is Center Align

3. Math Mode Suggestion Box #back to top
Suggestion box is the core of editor (trigger by "\" on keyboard), the main purpose is to input text and mathematic symbols
as quick as possible and not losing the flow of input. (by not moving mouse). Suggestion
box will be different from Text Mode and Math Mode
Select math-container to generate a place to input math formula, continue to press \ to insert symbols, suggestion box will automatically turns into:

Suggestion box is designed with 4 main options as [All], [Composite], [Categories] and [Drawing].
- [All] contains all symbols that is provided by suggestion box
- Composite symbols (frac($\frac{x}{y}$),$\sqrt[y]{x}$...) are included in [Composite]
- Composite symbols are also devided into different categories under [Categories] like
belows

- [Drawing] is contains many basic symbols, it is an advanced feature that helps to identify
very quickly as simple as drawing it directly using the algorithm. For instance,
just draw $\alpha $ to the drawing box like below:

4. Table#back to top
Table can be inserted by using Suggestion Box with name \table, the default table 3 x 3 will be inserted.
Another way to insert is using [icon], it allows user to select how many row/column to insert:

4.1. Resize
Rows and columns can be resized by hover on Vertical or Horizontal Border and drag to increase or decrease column width and row height, there are some constraints:- Minimum Column Width is 10 pixels
- Minimum Row

But if you resize on the first Vertical Line or the last Vertical Line of Table, Table will manage its own width, and will not follow Document Width. For example:

4.2. Border
You can control border to show or hide in one cell or select multiple cells, click icon on toolbar:
Options:
(1) Add Borders at all sides.

(2) Add Borders at inner sides.

(3) Add Borders at outside

(4) (5) (6) (7) (8) (9): Adding Borders at Top, Middle, Bottom, Left, Center, Right
(10) Remove all borders

Note: For first 9 options (except last one) are accumulated, they will not remove other sides. For example if you select Left Side, it will not remove Top/Right/Bottom sides. Usually you need to select last Option to remove all sides first
4.3. Align
Apart from Text Alignment: Left, Center, Right. There are vertical alignments:

4.4. Merge Cells
Select multiple cells and right click to select "Merge Cells", selected Cells can not be merged if merged result is not a Cell. For example: Cell 1, 2, 3,4 are allowed to merge:
become:

Cell 1, 2 are allowed to merge:

become:

Cell 1, 2, 3 are not allowed to merge

Merged cell can be unmerged by Right Click and select "Unmerge Cell"
4.5. Context Menu
Select any cell, and right click to show more options to interact with Table :
Select multiple cells, and right click there are only options to remove Rows/Columns and Table:

4.6. Features not supported
- Border Style, Colors
- Background Colors
5. Matrix, Array, Cases, Aligned, Gathered, Align, Gather#back to top
5.1. Matrix
Name: \matrixDefault matrix is $2\times 2$ with parenthesis, click on

- (1) to change to another layout (Array, Cases, ...)
- (2) modify number of rows
- (2) modify number of rows
- (3) modify number of columns
- (4) select Bracket Type

Select any cell, and right click to show more options to interact with matrix :
Select multiple cells, and right click there are only options to remove Rows/Columns and Table:
5.2. Cases
Name: \casesOptions as the same with Matrix, without Options to select Bracket Type

5.3. Gathered
Name: \gatheredThis layout is used when you want to represent formulas in multiple columns, each column will be align center automatically, options as the same with Matrix

*Note: there is Gather in Text Mode, which is the same feature, but the space between columns will be bigger
5.4. Aligned
Name: \alignedThis layout is used when you want to represent equations look like this:

Or something like this
 *Note: there is Aligned in Text Mode, which is the same feature, but the space between columns will be bigger
5.5. Array
Name: \arrayThis layout is like "Table" which allow you to have borders and adjust text alignment for each column, Options:

- By clicking on
 , you will be in "Border Management Mode", click on any side of Row or Column to show or
hide the border, then click outside to exit out this Mode:
, you will be in "Border Management Mode", click on any side of Row or Column to show or
hide the border, then click outside to exit out this Mode:

You can have borer as below

- With
 you are able to adjust Text Alignment on Column which your cursor is currently on, you may have somethings like this:

5.6. Gather
Name: \gather*Note: Insert from Text Mode This layout is the same with \gathered layout, but the spaces between columns will be separate equally, for example 2 columns:

Or 3 columns

Tag can be inserted on the right from each column on every row as example above.
5.7. Align
Name: \align*Note: Insert from Text Mode This layout is the same with \aligned layout, but the spaces between columns will be separate equally, for example 2 columns:

Or something like this with 4 columns

Tag can be inserted on the right from each column-pair on every row as example above.
6. Brackets#back to top
6.1. Default brackets
By default, brackets height will be adjust automatically if it found paired "open-closed" brackets, for example:
For other delimiters likes:
 , in order to have heigh adjusted automatically by its content, you need to insert via
Suggestion box, type "pair", you will see a list of pairs you can insert:
, in order to have heigh adjusted automatically by its content, you need to insert via
Suggestion box, type "pair", you will see a list of pairs you can insert:

In some cases, you don't need a pair of brackets, but only one side and still want to have bracket height adjust automatically by its content, we can use an special one called "empty bracket". There are 2 kinds of them with the names: "\left." and "\right." (note "dot" at the end).
For example, lets say you want to input somethings like this:

If you click on formula above, you will see and "gray bar" on the left of $\frac{a}{b}$, which is "empty bracket" with name "\left." in Suggestion Box, this "empty bracket" allows Mathcha to specify which is the content for the height of the "|" (name: "\left|") to be adjust automatically.
More examples:

These symbols with height adjust automatically () [] {} and :


6.2. Force Normal Brackets
Brackets can be used as normal character with normal height, for example:
Search in Suggesion Box as the names in table:
 And other brackets without prefix \left or \right
6.3. Manually adjust brackets height
Name: \bigl or \bigrIn some cases you want to force bracket with certain height, you can use \bigl or \bigr and use setting

Options: image[http://i.imgur.com/VVho6fj.png]
- (1) Select the Size of brackets
- (2) Select Bracket Types
- (3) Select Open or Closed Bracket
7. Undo/Redo/Copy/Paste/Cut#back to top
Those commands used by Shortcut from your Keyboard:
Mac:
- Copy: ⌘ + C
- Paste: ⌘ + V
- Cut: ⌘ + X
- Undo: ⌘ + Z
- Redo: ⌘ + ⇧ + Z
- Select All: ⌘ + A
- Copy: Ctrl + C
- Paste: Ctrl + V
- Cut: Ctrl + X
- Undo: Ctrl + Z
- Redo: Ctrl + Y
- Select All: Ctrl + A
Or Click on
 For Undo/Redo
8. Shortcuts#back to top
There are some shortcuts which is very useful to input for example: $ to insert \inline-math, ^ and _ to insert \power and \index
Shortcuts can be found in Suggestion Box, if symbol has shortcut, you will see on the left of that symbol and also inside Description (at bottom of Suggestion Box), for example shortcut for \inline-math
Note*: If you are using any input source for your language (for example Vietnamese on Mac), Shortcut may not work properly
There are shortcuts table symbols:

9. Drawing Area#back to top
This feature is very powerful, it helps you not only to draw Diagram/Graph, but also allow you to insert any formula with any position and rotation, in case supported Latex Layout is not enough, you always have this option as a free style layout.
Step 1: To insert a Drawing Area into Math Editor, Click
 then a Grid View will come out like below:

Step 2: When the Drawing Area appears, the menu bar will change into:

- Click (1) to turn on/off the grid view of the drawing area
- Drag (2) to the left/right to modify squares's size of the grid
- Click (3) to Formula on grid will be snaped with grid when moving using mouse
- Click (4) to turn on/off the grid only on editing
- Click (5) to save any math's formula in Math Mode
9.1. Tool bar

Tool bar is a generalization of action bars that provides a lot of options for drawing on Drawing Area. You can find many options of it showed below.
9.2. Text
9.2.1. Display Text in Drawing Area
Step 1: Click on tool bar to insert a Text Box into Drawing Area (All texts in Drawing Area are in Math Mode, Text Mode is not supported yet), you may see something like this:
Step 2: Click on Text Box's object which has just appeared, menu bar will turn into:

- Click (1), (2), (3) to set/remove Text Box's border, styles of border are included Rectangle, Ellipse and Circle
- Click (4) to adjust border-width ( multiple border sizes included thin, medium, thick...)
- Click (5) to set border-color
- Click (6) to fill in the Text Box's background-color
- Drag (7) to the left/right to rotate a Text Box
- Click (8) to change text-color
- Click (9) to change font-size
- Click (10) to remove Text Box's object from drawing area
9.2.2. Border
Step 1: Click (1) to turn border-style into a Rectangle:

- Drag
 to the left/right to round the edges of a text box 's border by adjusting the radius of rounded corner
- Click
 to apply frame-stroke-style
Step 3: Click (3) to change border-style into a Circle
9.2.3. Connected Arrow
 There are various options you can modify for Arrow:

- Click (1), (2), (3) to switch between Straight Line, or Curve Line, or Curve Line with 2 control points
- Click (4), (5) to change Arrow Tail/Head
- There is common scenario that you want to have a hole at middle of arrow, click (6) to achive that
- You will see 2 more options
 which allow you to change position of hole and how big the hole is, click and drag to increase/decrease value as the mouse goes, or double click to change value directly
- Click (7) to change arrow thickness, and (8) to change arrow color
- Click (9) to remove connected arrow's object from drawing area
9.2.4. Commutative Diagram
App supports features to quickly create Commutative Diagram by following steps below:Step 1:
- Insert Text Box into Drawing Area, you will see something like this:

Step 2:
- Insert another Text Box, move this one to the right of the first one
- Select the first Text Box, you will notice 3 arrows around textbox, click on any of those and drag to the position of the second textbox, then you will see an arrow connect 2 textboxes
- Then you can double click on textbox to modify the text inside
- Continue to do same things you will create somethings like below:

- Combine with Connected Arrow's options, you can create Diagram like below:

9.3. Line
You can find many type of lines on toolbar:
9.3.1. Straight Line
 There are many options that we can use to modify as below:

- Click (1) and (2) to select styles of head/tail of an line
- Click (3) adjust line-width
- Click (4) to set line-color
- Click (5), (6) to add/remove a point (after add one more point, line will turn into a three-point shape)
- Click (7) to make collisions between two or many shapes appeared
- Click (8) to prevent collision points appeard
- Click (9) to arrange front/back of a line's object (compared to the other objects)
- Click (10) to remove an line from Drawing Area
9.3.2. Curved Line

 Click on the curved line, then you can see two points. Each point is connected with one attached point on the tangent of the curve. The point connected with the main point can be adjust to create smooth curves.
- Click
 to bend the curve reverselly
- Refer Straight Line's options to other options
9.4. Arrow Straight Arrow
Straight Arrow Straight arrow is inherited the basic options of an arrow which has its head is modified.
Curved Arrow
 Curved arrow is inherited the basic options of an curved arrow which has its head is modified.
9.5. Shape
You can find many types of shapes on toolbar:
and

9.5.1. Circle
 When click on the circle, four points at four corner will appear allow us to modify size of the circle
Options of a Circle Shape are as below:
When click on the circle, four points at four corner will appear allow us to modify size of the circle
Options of a Circle Shape are as below:
- Click (1) to adjust border-width ( multiple border sizes included thin, medium, thick...)
- Click (2) to set the circle's border-color
- Click (3) to fill in the circle's background-color
- Click (4) to apply frame-stroke-style
- Drag (5) to the left/right to rotate a circle
- Click (6) to make collisions between two or many shapes appeared
- Click (7) to prevent collision points appeard
- Click (8) to arrange front/back of an line's object ( compared to the other objects)
- Click (9) to remove an line from Drawing Area
9.5.2. Ellipse
 Options of a Ellipse Shape are much the same as Circle Shape excepted from when modifying the size of circle, width and height can be modify as well, compared to the circle, only radius of a circle can be modified
9.5.3. Segment of Ellipse (Arc)
 Arc is used to display an angle in geometry, compared to a circle, when click on the segment, two yellow points will appear in order to protract the lenght of the segment
Options of a segment is showed as below:
Arc is used to display an angle in geometry, compared to a circle, when click on the segment, two yellow points will appear in order to protract the lenght of the segment
Options of a segment is showed as below:

- Click
 to show/hide two radius that start from center of the ellipse and end at two head points of the ellipse
- Refer circle's options for other options
Step 2: Insert a segment and rotate until it fits the angle

Step 3: Combine circle shap, line and segment, we can perform a complicated shape like below:

9.5.4. Rectangle
 There are lots of option for rectangle:

- Drag
to the left/right to round the edges of a rectangle's border by adjusting the radius of rounded corner
- Other options can be refered by taking a look at circle's options
- These are shapes that are relatives of rectangle
9.5.5. Square
 Refer rectagle's options for square's options.
9.5.6. Polygon
 Options for polygon are show as below:

- Click
 to add/remove a point (after add one more point, polygon will increase one more side)
- Other options can be refered to circle's options
9.5.7. Regular polygon
 Options for Regular polygon:

- Click
 to add/remove a side of a regular polygon
- Other options can be refered to circle's options
9.5.8. Polycurve
 Click
Click
 on tool bar to insert a polycorve
Options for Polycurve:
on tool bar to insert a polycorve
Options for Polycurve:

- Click
to bend the curve reverselly
- Other options can be refered to circle's options
9.6. Axis
 Axis and other type of coordinates is showed on tool bar. Click
 to inspect more options
Options for Cartesian coordinate system is showed as below:
to inspect more options
Options for Cartesian coordinate system is showed as below:

- Click
 to enable separator, when it turns on, you can see some other dependant options:

- Drag
 to the left/right to increase/ decrease seperator's distance
- Click
 to adjust number-color
- Other options can be refered to circle's options
9.6.1. Wave
 to adjust number-color
Options for Wave is showed as below:
to adjust number-color
Options for Wave is showed as below:

- Drag
 to increase/decrease wave length
- Drag
 to set start of wave's position
- Other options can be refered to circle's options
9.6.2. Quadratic Equation
 Options for Quadratic equation system is showed as below:
- Drag
to increase/decrease wave length
- Drag
to set start of wave's position
- Other options can be refered to circle's options
9.6.3. Cubic equation
 Options for Cubic equation is showed as below:

- Drag
 to increase/decrease the height of the curved line compares to horizontal line
- Other options can be refered to circle's options
9.6.4. Spring
 Options for Spring coordinate system is showed as below:

- Drag
 to adjust separator distances
- Other options can be refered to circle's options
9.6.5. Brace


- Other options can be refered to circle's options
9.6.6. Straight Ruler


- Click
 to select styles of head/tail of the ruler
- Other options can be refered to circle's options
9.6.7. Curved Ruler


- Click
to select styles of head/tail of a ruler
- Drag
 to increase/decrease separator unit distance
- Drag
 to increase/decrease separtor distance
- Other options can be refered to circle's options
9.7. Arrow Head and Other Basic Shapes
Arrow heads and others are show on tool bar. Click to see more options.
9.7.1. Aim Circle


- Other options can be refered to circle's option
9.7.2. Cross

- Other options can be refered to circle's options
9.7.3. Single Arrow-Head
 Options single arrow-head is showed as below:

- Other options can be refered to circle's options
9.7.4. Double Arrow-Head
 Options for double arrow-head is showed as below:

- Click
 to increase/decrease separator distance
- Other options can be refered to circle's options
9.7.5. Arrow-Head Shape
 Options for arrow-head-shape is show below:

- Drag
 to increase/ decrease separator distance
- Other options can be refered to circle's options
9.7.6. Curve-Arrow-Head
 Options for curved arrow head is show below:
- Other options can be refered to circle's options
9.8. Graph/Diagram Examples

10. Document
10.1. Share
Document can be shared by clicking on Share button on Top Bar, a dialog will show up, and you can tick to enable sharing (affect immediately on clicking). - Note that Share button (and other options on Top Bar) is for current open document (not the one highlighted on left side bar).
- Shared Document seen by other people will be in Read Only Mode, peope still can select and copy or duplicate that shared document.
- Shared Document will be marked as Icon
 on left side bar.
- Document can be unshared by clicking on Share button again, and uncheck the checkbox.
- Shared link is public, any one with that link can see your shared document.
10.2. Document Management
Double click to open document, One Click is only select/highlight that Document.
From Left to Right:
- (1) Create New Document
- (2) Duplicate Current selected/highlighted Document (not the open one)
- (3) Rename Current selected/highlighted Document (not the open one)
- (4) Delete Current selected/highlighted Document (not the open one)
11. Import from Latex
In case you already have a fragment of latex, and you want to import into the App, place cursor in any text in Text Mode, open Suggestion Box → \from-latex or Select Menu → Import from Latex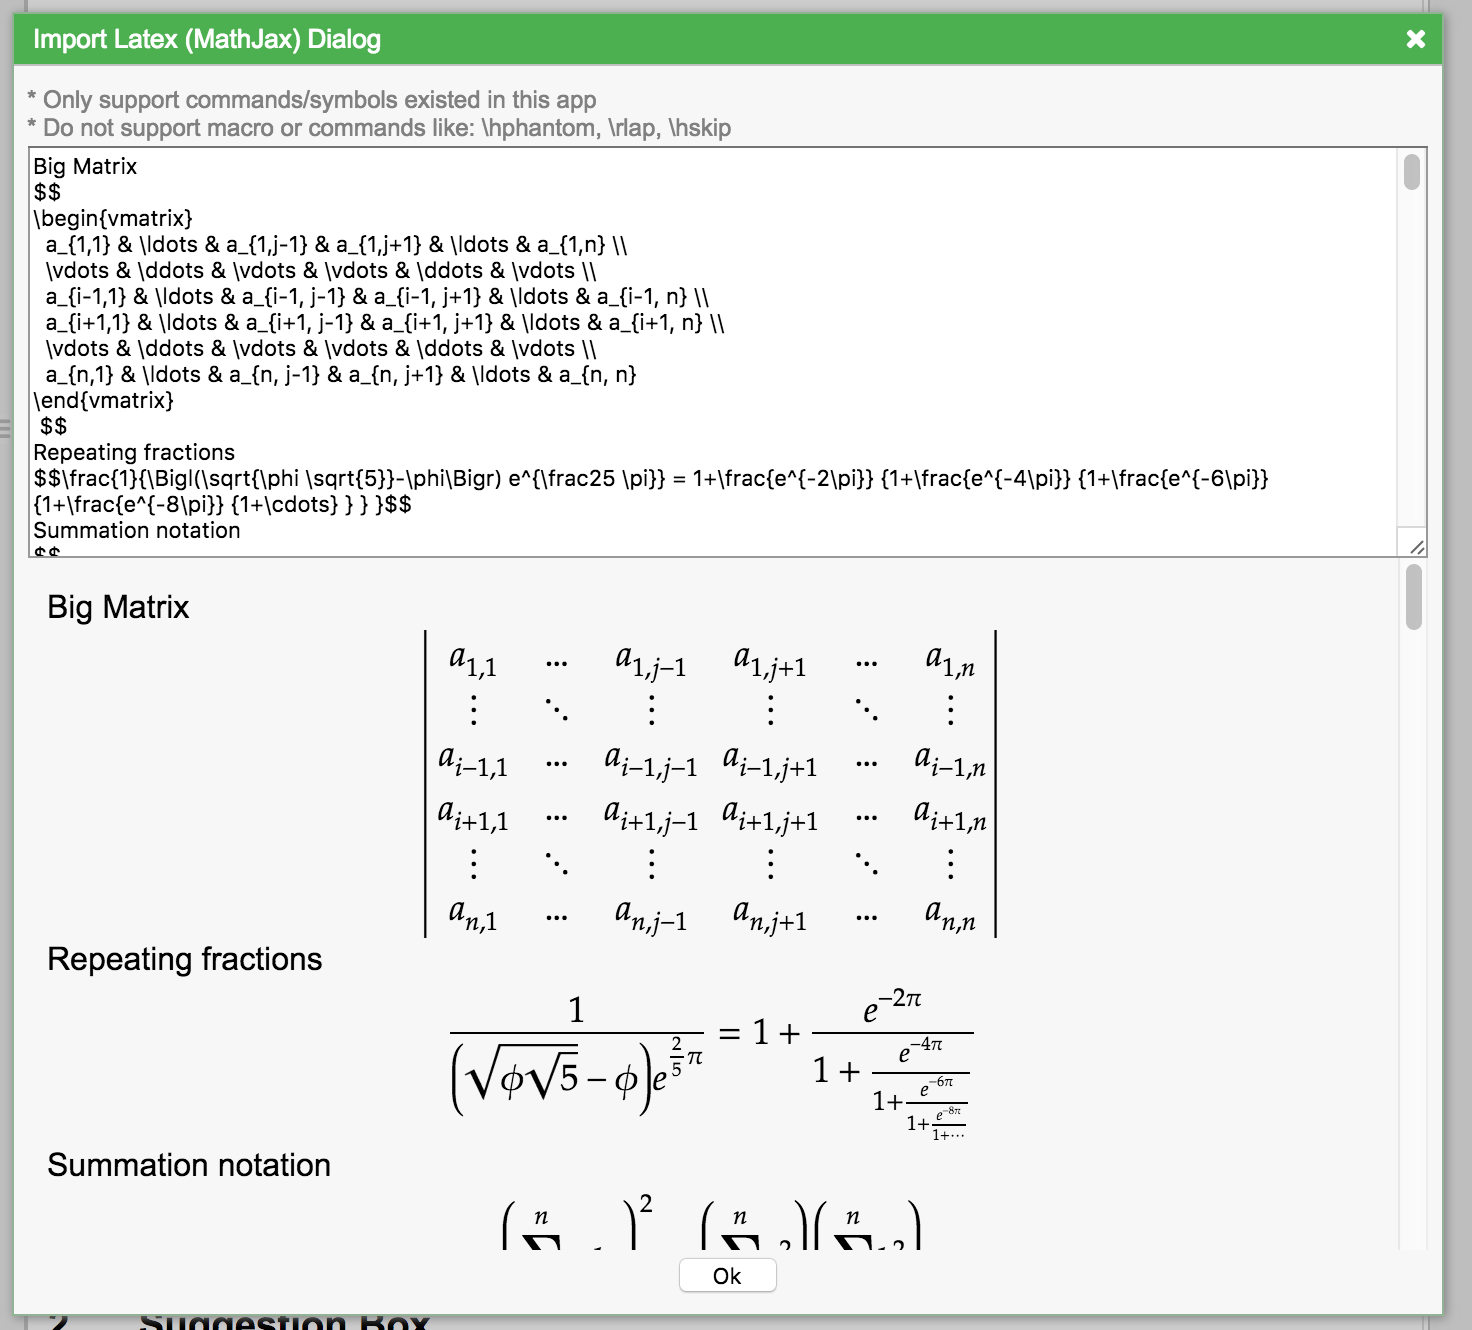
- Feature import latex can only be inserted at Text Mode (not inside Math Mode)
- Support most of latex symbols using in MathJax, Latex will be parsed in scope of pair $ $ or $$ $$, any text ouside will be parsed as normal text.
- It can not parse any Latex from Text Mode in this release
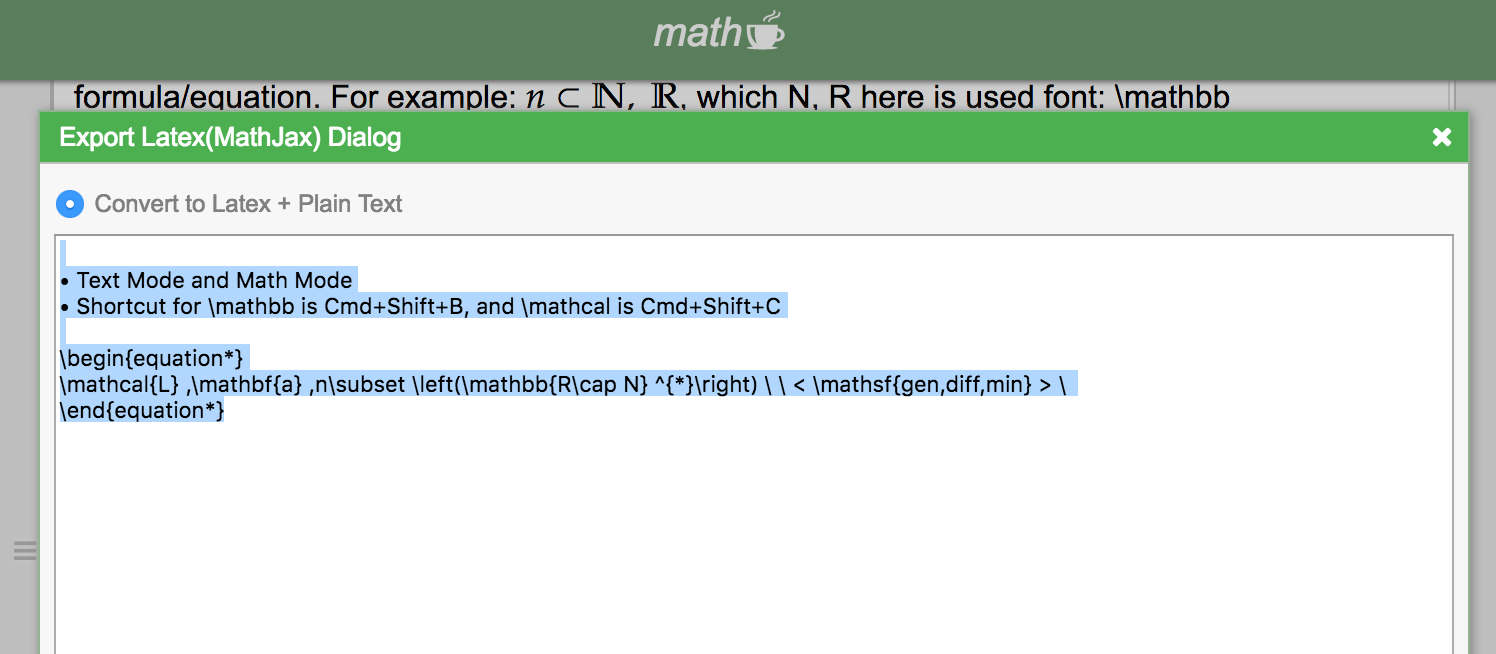
12. Export to Latex
- Convert to "Math Mode Latex + Plain Text" is only option supported in this release.
- Select any part of text, and click export icon to export a section
- Or elect Export menu to export whole document or selection
- It can not convert to Latex in Text Mode in this release
13. Picture Box
Press \ to open suggestion box, then select [image-container], the result will appear like below:
On the left corner, Click
 to open picture box's options

- Click
to align an image to the left/right/middle
- Click [Both] to resize both width and height of an image
- Click [Width] to resize only the width side of an image
- Click [Height] to resize only the height of an image
- Insert url of an picture to text box which contains a "Please input an image url" message
- Click [Set Image] to fill an image into picture box
14. Save as Image (Png)
If you are inside Math Mode or Diagram, you will able to save to Image of that Math Mode (Diagram) region, for example with formula below:
Place cursor inside formula above, and click "Save as Image" button on Toolbar to download Image
This feature will not work in Safari browser, because of security restriction.
15. Printing
You can print document by click Menu → Print, or press ⌘+P .Note: You should not click Print from Browser directly, the reason is Application need to do some preparation steps before printing.
This feature only supports very basic printing, which is convinent to export to PDF, there is no any setting or advanced printing feature yet in this release